Azure Application Gateway is a powerful tool in the overall Azure arsenal. It offers flexibility in getting started, with the ability to start with basic configurations to get a grasp on things while offering advanced functionalities from a single pain of glass.
This is a tutorial for anyone else that stumbled over Microsoft’s documentation and looking for a walkthrough on how to get one stood up. This article focuses only on the Azure App Gateway, but paints the overall architecture to achieve for testing purposes. It does not include deploying the Virtual Networks, Private DNS, Static Website Storage Accounts, etc.
Spend consideration: This architecture runs at about $10/day, or $15/day if you don’t shut the VM off when not using it. A personal mantra of mine is if you’re going to invest in anything, invest in yourself. Ok, enough of that, let’s get started.
When planning out any cloud architecture, Azure or other, always take some time to first document clear requirements to achieve the goal.
Goals:
- Create an Azure Application Gateway not accessible on the Public Internet
- Use port 443 with a known domain (I’m using mclaughlin.solutions)
- Host Static Websites on Storage Accounts
- The Static Websites are split across multiple subdomains
- Initially deploy through Azure Portal with transformation into IaC deployments
In order to accomplish the aforementioned goals, take some time to first think about what the final state will look like, and what resources you’ll need. For this Project, we’ll need the following:
- Domain with pfx cert
- Virtual Network
- Azure Private DNS
- Virtual Machine
- Azure Bastion
- Three Storage Accounts
- Azure App Gateway
- Patience
There’s some sub-resources that will be created, but we don’t need to worry about them. These include Disks (For the VM), Network Interfaces, Private Endpoints, and Public IP Addresses (Which we won’t be using but are necessary – We’ll talk more on that later). With the goals and approach thought out, I then like to try and visualize how it will work. Some quick work in Visio and we have a design architecture:
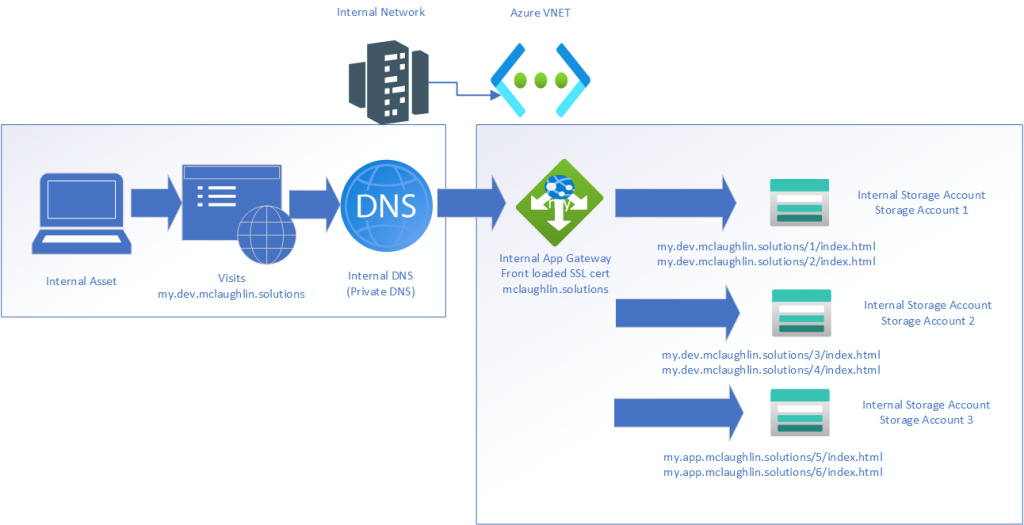
The picture we’re painting is a completely isolated, internally established Development environment. This allows for development without the risk exposure of having our in progress, non-tested work being public facing. Secure development for the win!
Focusing on the Azure App Gateway, I walked through deploying the Resource and chose to customize it to my liking afterwards.
Configure the Backend Pools. For each Backend Pool, you’ll have one target that points to your Storage Account using IP or FQDN. I did FQDN for mine. This is what mine looks like:

Configure the Backend Settings. You’ll do this three times (once for each storage account):
- Set the Backend protocol to HTTPS and Backend port to 443
- Set Override with new host name to Yes
- Set Host name override to Override with specific domain name
- Set Host name to the Storage Account
- Set Custom Probe to No, we’ll revisit after.
Mine looks like this:

Configure the Listener. Because Azure App Gateway deploys as both Public and Private, and because we want it to be Private, we need to create a Listener on the Private IP. This is what it should look like:
- Frontend IP is Private
- Use port 443
- Upload your domain PFX certificate
- Set the Listener Type to Multi site
- Set the Host type to Multiple/Wildcard
- Add in your hostnames/subdomains
Mine looks like this:

Configure the Rule:
- Set the Priority to 1
- Choose the Listener you created
- The next set of options are under Backend Targets
- Set Target Type fo Backend Pool
- Set Backend Target to one of your Backend Targets
- Set Backend Settings to one of your Backend Settings
- Click Add multiple targets to create a path-based rule
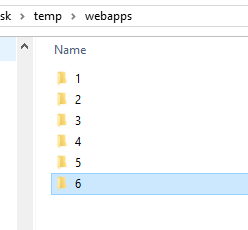
- My static website structure is basic, where 1/2 are on Storage Account 1,3/4 are on 2, 5/6 are on 3. They have basic index.html files that just denote which webapp it is, and what host it is on. Nothing crazy.
- Set the path to /1/*
- Set the Target name to 1
- Set the Backend Settings to the Storage Account hosting the Static Website in question
- Set the backend target to the corresponding Backend Pool
Rinse and repeat. Yours should look something like this at the end:

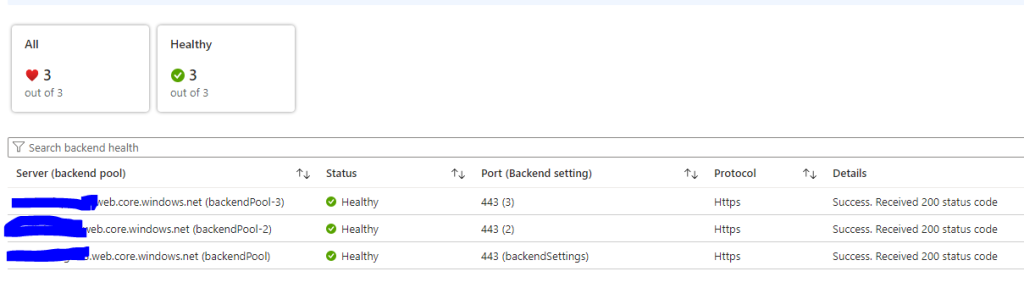
Remember when we set Custom Probes to no? Querying the Probes without specifying the website will fail, because it will return a 404 error as it only queries the top level of the Storage account.
So to fix this, go under Health Probes, and create 1 per Storage Account which points to the path to your Static Website. Referencing my structure above, I just chose one of the Static Website paths per host: storageaccount1.web.core.windows.net/1/index.html
storageaccount2.web.core.windows.net/3/index.html
storageaccount3.web.core.windows.net/5/index.html
Once you have the Health Probes configured, go back to your Backend Pools, and update each one to match, then click Backend Health and it will so Healthy:
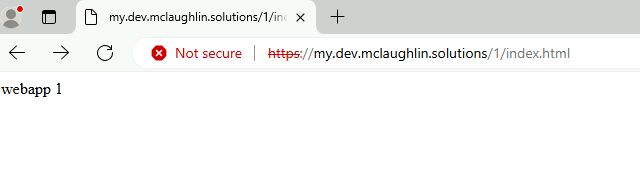
Now to test, go into your VM which is on the same VNET as the App Gateway.
Fire up Edge, and just try to walk each website. This is what mine look like from the internal VM:
Site 1 on Storage Account 1 on Subdomain 1:
Site 2 on Storage Account 1 on Subdomain 1:
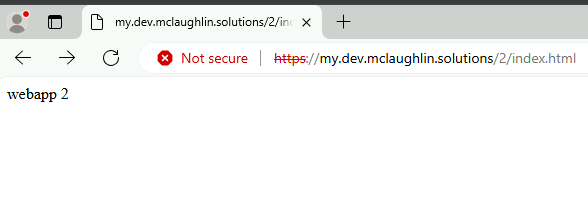
Site 3 on Storage Account 2 on Subdomain 1:
Site 4 on Storage Account 2 on Subdomain 1:

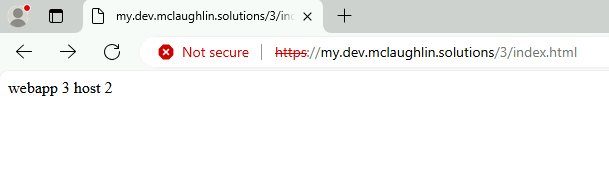
Site 5 on Storage Account 3 on Subdomain 2:
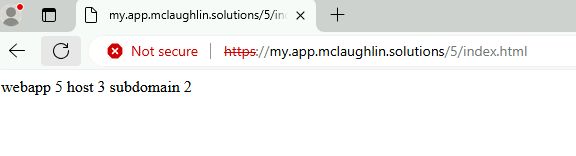
Site 6 on Storage Account 3 on Subdomain 2:

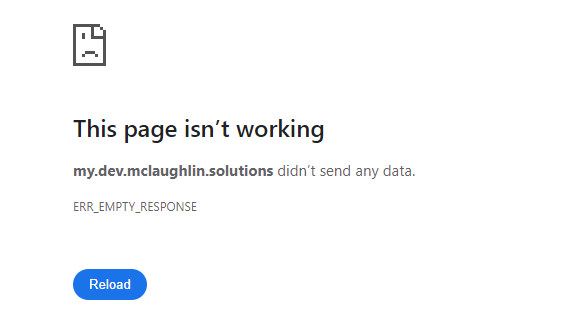
When trying from the Public Internet, you’ll see it fails:
While the Azure App Gateway offers way more, this was deployed using an Azure App Gateway Standard v2 SKU and Internal only so we can skip using the WAF v2 SKU.
There are other considerations when using Azure App Gateway to achieve a secure solution, such as configuring Alerts and Diagnostic Settings. I also highly recommend once you’ve configured it, ensured it’s working, to go under Automation > Export Template and save your work. This will allow you to delete your Azure App Gateway and underlying Resources, save money, but give you a deployable solution in the future should you need to stand one up quickly.
Thanks for checking out my post!